
6 Ways Older Triathletes Contribute to the Sport
As a 53-year-old triathlete I consider myself a great match for the sport of triathlon. Here are six areas where senior triathletes contribute and enhance the sport.
I Spend Money
At this point in my career and life, I have a nice home, cars, and most things that I need. I have a higher percentage of disposable income that I dedicate towards my gear and training.
I understand and recognize value and I’m willing to pay for value. The adage “the cheap man pays twice” is something I believe in so I constantly look for quality and value first then price. My experience is that you end up spending less in the end if you are will to invest in quality. At my age I might be buying equipment that may last the rest of our triathlon career.
The best way for me to be successful is to develop the necessary skills and technique, then work on speed and endurance. This is why I am a firm believer in formal coaching. The Masters Swim team I am a member of has been extremely valuable in my swim success and improvement. And cost of a Masters Swimming License and the Y membership have been well worth the cost.
I also like to make the triathlon race experience more than just the race. I enjoy making a weekend out of it and am willing to travel for the experience. This year my A race is the Nautica Malibu Triathlon out in California.
Work to Bring Younger Athletes into the Sport
I have children that I have brought into the sport. Making the training and racing a togetherness thing has allowed me to bring younger athletes into the sport that would probably not have gotten into the sport. They are a lot younger than the 53-year Dad that just discovered the sport.
Partially funding their hobby hasn’t hurt; and I hope this gets them on the right path with quality gear and dedication. I am working to bring the youngsters into the sport.
Dedication and Focus
I am serious and focused on the sport. My generation understands the benefit of hard sustained work and the benefit of focusing this energy. I am goal-driven and display the traits that are necessary for goal achievement. I plan, set big goals and set my sights on bucket list races and achievements. I show people how to succeed.
I bring the goal attainment success I’ve experienced in other parts of my life into the sport. Setting and achieving goals is not an overnight activity and I hope others pick this up by watching me.
I am not easily distracted and understand the time commitment necessary for success. I am not out jumping from thing to thing; I know what I want and am dedicated to mastering the sport.
With all this focus and dedication, I’m a great example of the 5:00 am training plan. My days are busy so I’m dedicated to getting my workouts out of the way early allowing the rest of my day to progress as planned. I plan most everything.
Socially Support the Sport
I am a great ambassador for the sport. The fact that I have this blog is evident. I am active on Facebook and Twitter and really share what I learn and my enthusiasm for the sport. I also use it to support the younger athletes as they chase and achieve their goals.
I enjoy the camaraderie of the sport from my master’s swim team to the open water folks I swim with to the guys I race with. I really enjoy making this individual sport a group event.
I enjoy learning about the sport through books, YouTube, podcasts and magazines. I embrace the old and new media to get the knowledge I need.
Display Efficiency
I am also busy with family and my career. I don’t have time to waste on unproven training techniques and equipment. I may be more conservative in this regard but I focus on high-quality proven equipment and training methodologies. This helps drive efficiency in my training and approach to the sport.
This focus also requires that I am efficient with my training. Each workout has a specific purpose and is planned out in every detail. Maybe too much but I know when I have completed a training workout if I was on plan or not. I don’t have a lot of junk miles.
Patient with Development – long-term View
This may sound funny or ironic but I view triathlon as something I can do for the rest of my life. Which is probably thirty plus years. That gives me a great long-term view on continually improving. I want to be efficient in developing my skills and technique but I am long-term as it relates to speed and endurance. I’m not training for the next Olympics or a college scholarship.
I am working out and training for the sport and me not the mirror. Over time that will take care of itself. I’m not looking for a magic bullet but rather recognize expertise and am willing to listen to it, regardless of the provider’s age. Most of them are younger than me anyways.
Summary
I describe myself and other 50+year old triathletes I know as having child-like enthusiasm with adult checkbooks. We’re good for the sport.
Triathlon Tuesday 5th Edition

Here is this week’s edition.
5 Ways For Beginner Triathletes to Get Faster – From the Trainingpeaks.com blog. As a beginning triathlete I found these practical tips useful. I will be reviewing these tips as I go through my year in review and plan for next year.
Nautica Malibu Triathlon - All of my races have been in Ohio. I decided to pick an A race that was completely different. This will allow me to race with my older boys and completely get out of my comfort zone. Open water ocean swim sure isn’t the state park! Are you getting out of your comfort zone?
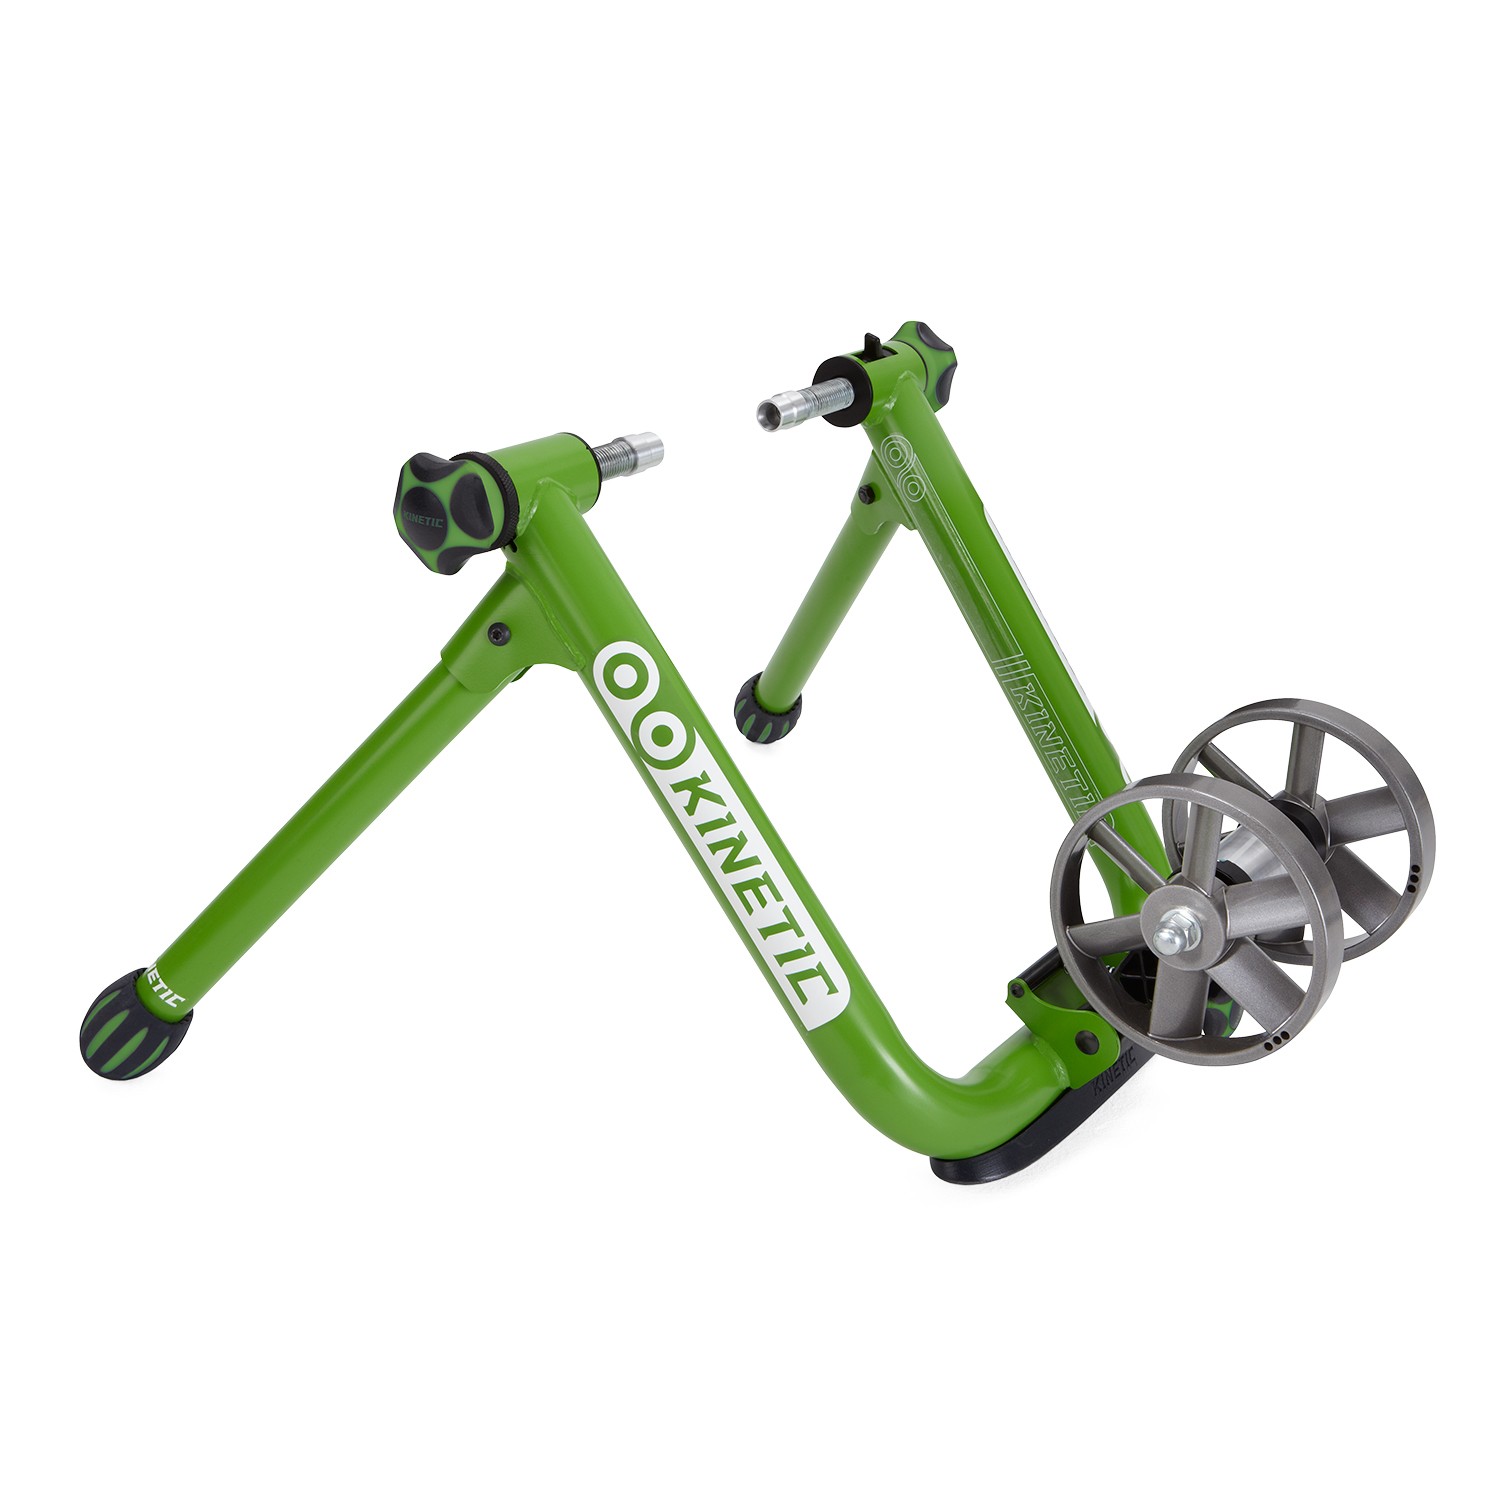
Kinetic Cyclone Trainer - Here in the Midwest it is tough to ride outside year-round. I rely on this wind resistance trainer for early morning and poor weather rides. I can quickly put my bike on and off and is extremely stable. It does not have a power meter or electronic resistance adjustment.
Stages Power Meter – I just installed this power meter on my Cervelo and I’m enjoying the data. I will have a detailed review later on this power meter but for less than $600 this single side meter is working for me. The power and cadence data has been helpful for me as I train for my last race of 2016.
Triathlon Tuesday 4th Edition
This week’s installment is all wet. This is the gear I use both in the pool and open water.
Blueseventy Men's Reaction Sleeveless Wetsuit – In the Midwest most races through June are wetsuit legal. I picked up the wetsuit from our team’s sponsoring store Up and Running. At tip – look for a local wetsuit day. This is a great opportunity to try it in the water before you buy it.
TYR Special OPS 2.0 transition goggles - These goggles have polarized lenses that adjust to the sunlight. They work equally well in the pool and open water. I have settled on these to have one pair that I can dial in the fit. I do carry two other pair just in case.
TYR SPORT EBP Burner Fin – Fins are a critical tool for our swim workouts. A must-have training tool. This fin fits extremely well and is just the right length for my swim development.
TYR 2.0 Ultralite Snorkel – A quality swim snorkel that fits well around the head and is just all enough to function in the pool. Another tool used weekly. Also comes with two air restrictors; although I rarely use them.
Speedo Team Pull Buoy – This tool allows you to focus on your stroke, and body tautness. We use the swim buoy a lot during warmups. Typically used with swim paddles.
TYR Catalyst Contour Training Paddles I use these along with the pull buoy to focus on stroke form while stabilizing my lower body and eliminating the kick.
Finis Kick Board – Any kickboard will work. This is the one I chose. Workhorse for working on your kick and elevating your heart rate during warm-ups.
Equinox Nylon Mesh Stuff Sack 23 x 36 – This bag is big enough to carry all my gear to the gym or lake. The mesh is critical to allow my gear to air dry. Tip – buy bigger than you think you need.
6 Factors I used to Select my Triathlon Bike
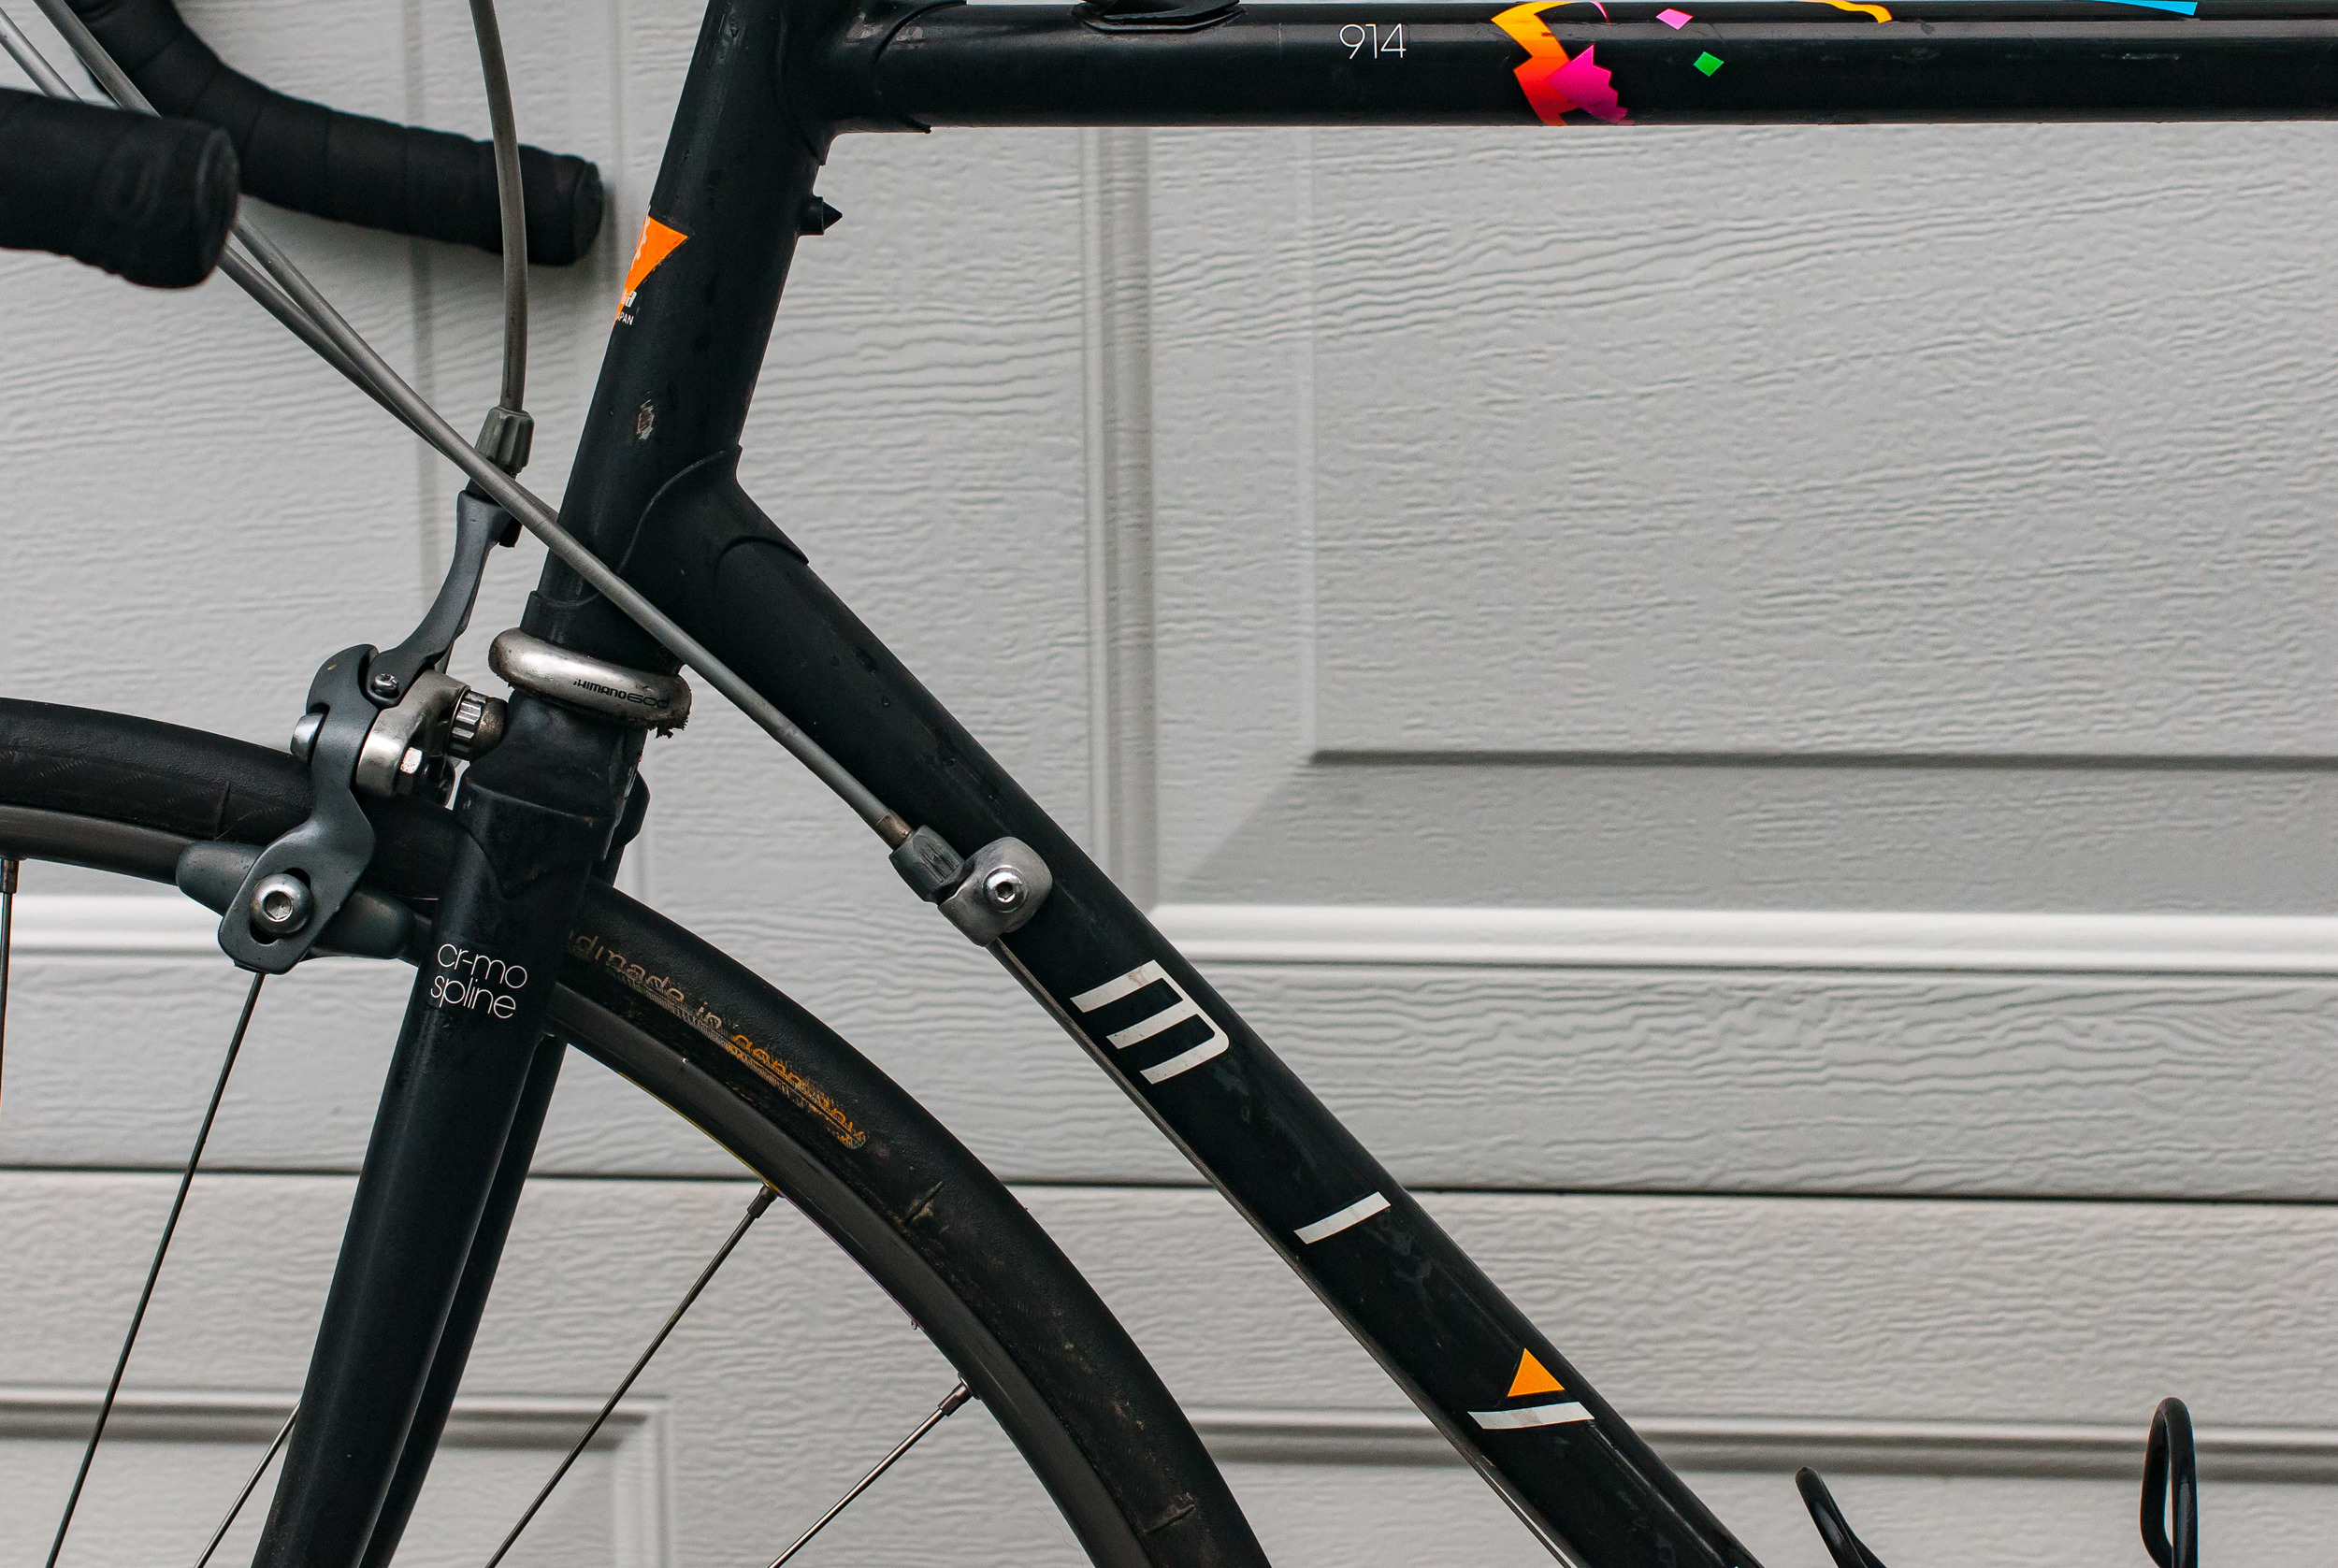
I am new to triathlon and getting into the sport past 50 has been interesting. I started out this year in the sport with the road bike I used back in the ‘90’s a Miyata 914. A sold bike with Shimano Ultegra 600. I did my first two sprint distance races with the normal setup and then added Redshift aerobars for the last sprint race.
I am really enjoyed triathlon so I set out to upgrade my bike. I noticed that this time of year (July) bikes started to go on sale. I suspect the dealers are moving out inventory so that new models can come in. Looks like middle to late summer (at least in the Northern Hemisphere) is the time to buy a new bike.
Here is how I went from my Miyata 914 to a new Cervelo P2.
Set a budget and Timing
New bikes can quickly get up into the $5,000+ range. I set my budget at $3,000. I felt $3,000 would get me a bike I wouldn’t outgrow or outperform. I don’t make my living at triathlon, other than a few tee shirts I’ll earn $0 dollars off my racing. However, at 53 I wanted this to be close to the last bike I needed. I wanted to spend enough that I wouldn’t “run out of bike”.
I am a firm believer in “the cheap man pays twice”. If you try and go too cheap you end up having to buy again quickly and if you saved a little more money and combined that with what you spent on the cheap bike you would have a great bike and would probably have spent much less in the end.
Decision - $3,000 budget.
Road Bike vs. Triathlon Bike
I have a road bike that works and I can use on group rides and poor weather training. Essentially I already have a functioning road bike. I do not plan on doing any road racing so I have no need to upgrade my road bike at this time. Training on the old heavier road bike would help with my strength and endurance.
The big difference between a road and triathlon / Time trial bike is the frame geometry. What does that mean? With a triathlon bike you are positioned more forward over the bottom bracket than on a road bike. This allows you to get in the aero position more comfortably. A triathlon bike is designed to be ridden in the aero position while a road bike is designed to be ridden in various positions.
My focus is on triathlons and I wanted the right tool for the right job.
Decision - dedicated triathlon bike.
Frame vs. Components
As you would expect, as you move up within a Company’s component line the price of the bike goes up. You typically can get the same frame built out with different component groups. A bike with Shimano 105 is less expensive than Ultegra…than Dura Ace.
When I purchased my road bike from International Bike Shop in Bellbrook Ohio, in 1990 (it is still a thriving store) I’ll never forget the advice the owner gave me. He said you should always buy the best frame you can afford because you can upgrade the components later. I upgraded the group set, the wheels, handlebars, pedals, basically everything on the Miyata.
On my new bike I wanted something with Shimano components. I didn’t need Dura Ace right off the bat, but wanted Shimano. Also within the Shimano line essentially everything is compatible outside of the electronic shifting, so you can upgrade individual components through their line from 105 – Ultegra – Dura Ace.
What you get when you go up within a company’s component line is reduced weight and some improved quality. I can lose pounds off the “engine” for free or loose ounces off the bike for $’s. I’m on the free weight reduction plan right now.
From a frame perspective I wanted carbon fiber. I believe all the major triathlon bikes are carbon these days. The combination of being light and strong is key.
Decision – Buy the best quality frame I could afford with Shimano 105 components.
Research
First thing I did was see what bikes friends I trained with were using. I found this extremely valuable as you generally get insight into their thought process for a typical age-grouper. Just keep in mind to have a bit of skepticism as people will not want to admit they made a bad decision. This was extremely helpful.
Then I did the typical searches:
- Best triathlon / time trial bikes under $3,000, best triathlon frames, reviews each major brand. Typically, I saw the Cervelo brand on the lists.
- I looked at consumer rankings for brands. I typically saw Cervelo towards the top.
- I also searched for what brands had the most complaints or issues. Although I wanted to be careful with this as typically people are more apt to complain when they aren’t happy vs. Posting when they are happy.
- I didn’t care too much about what the pros were riding. They have sponsors I don’t. Which means they get free bikes I don’t.
At this point the typical names you recognize came to top of the list; Felt, Cervelo, Diamondback, Quintana Roo.
With those manufacturers I don’t think you can get a bad bike. The quality, workmanship and service behind these bikes is there.
Local Dealers
You can buy a bike on-line. However, I want a local dealer that knows the bike, has a relationship with the brand and can service and answer questions for me. After talking with my training friends, researching on-line for quality and customer views / reviews I then researched what brands were available locally. In the Middle Ohio that included Dayton, Cincinnati and Columbus.
This helped narrow down my selection a bit. Cervelo was a brand well represented in the region.
One thing I also did was search my company’s discount website to see if there were any bike discounts. This is something to not overlook as companies are always trying to find ways to improve their employees’ health (read- reduce health care costs) and cycling sure does that. My company actually offered a Diamondback discount through an on-line portal.
Fit and Feel
The most important aspect for me was fit and feel. I knew any current triathlon bike I got on was going to feel so much better than my twenty-six-year-old road bike.
Proper fit is critical on a triathlon bike. On a road bike you have a variety of contact points with the bike; you can ride in the drops, on the brake hoods, on the upper bars. All these positions change how you are positioned on the bike and affect how the bike is fitted to you.
On a triathlon bike you essentially have 2 contact points with the bike. In the horns and in the aerobar position. This makes fit critical as you need to be comfortable in the aerobar position. This allows you to dial in fit as you know what position you will be riding in.
With locally supported bikes identified, and the dealers I went into the shop for a test ride and to discuss the individual brands. For me that was a trip up to Logik on their anniversary sale weekend.
I discussed the various bikes they carried including Felt, Cervelo. I rode the Cervelo and Felt. I really felt great on the Cervelo.
In discussing the Cervelo with the guys there I understood that the P2 and P3 were the same frame. The P3 has an upgraded fork and cockpit. The rest was identical. This came at a $1,000 price difference.
I discussed sizing and fit with the guys and settled on the 56 cm bike.
Conclusion

I decided on a budget, did my research both in person and on-line and finally rode the bikes that fit my budget. Key – Don’t ride a $5,000 bike when you have a $3,000 budget!!!
In the end I am happy with my black and white Cervelo P2 with Shimano 105 group on it.
Triathlon Tuesday 3rd Edition
This week’s triathlon gear and training and goodies.
Yoga for Triathletes by Jennifer Alexander CD - Great warm down yoga routine for after workouts. Really focusses on the lower back and legs. Awesome way to cool down and stretch out. She also has a full one-hour yoga routine on the CD. Well worth the $25. I use this regularly to try and keep my lower body flexible.
Trainingpeaks.com – This is the go-to triathlon and endurance sport training log. I have my Garmin account automatically linked to my trainingpeaks.com account so that everything is synced up. They offer syncing for numerous devices.
If you have a coach, you can log your coach in and they can review your workout data.
StretchRite Stretching Strap -This strap sits in my home office and I use it daily. A quick way to easily stretch your hamstrings. As someone over 50 I am focused on, and spend a lot of time, stretching out and trying to stay flexible. This is a key tool I use daily.
The One-Hour Bike and Run Race Preparation Workout from Triathlete and coach Mike Ricci, owner of D3 Multisport -This workout is designed for the Sprint or Olympic distance triathlete that wants a focused time efficient workout. Mike gets you through a great bike and run workout in an hour.
Thule 9029XT Hitch Mounted Four-Bike Rack -This hitch mounted rack comes in a four and two bike option. I have the four bike option. This is a heavy, solid rack that includes sway straps, folding arms and the ability to fold the rack down to allow access to the back of your vehicle. This rack also installs with one bolt which although extremely secure, allows for removal in less than a minute.
Triathlon Tuesday 2nd Edition
Here are Four Triathlon books on my shelf that I find invaluable as I start out in my triathlon hobby:
1. The Well Built Triathlete by Matt Dixon
Matt’s book focusing on training. He builds on his training philosophy of four equal pillars of Training, Recovery, Nutrition and Strength. He has specific training plans and approaches for each pillar.
2. The Triathlete’s Training Bible 3rd Edition Joe Friel
This book is the bible of triathlon and should be on everyone’s bookshelf. Joe’s book is a comprehensive reference guide on everything you need to know about triathlon including, gear, training approaches, execution form for the swim bike and run, and nutrition. If you were going to only buy one book I would recommend this one. Joe is also the founder of trainingpeaks.com
3. Triathlon Training Fundamentals: A Beginner's Guide To Essential Gear, Nutrition, And Training Schedules by Will Peveler, PhD
This book is for the true beginner. It starts with all the basic information you need to get started successfully. Will breaks down the swim, run and bike along with all the gear and training philosophies.
4. Triathlon 2.0 Data-Driven Performance Training by Jim Vance
Jim worked closely with Joe Friel during his competitive triathlon career and is now a coach. Joe’s book focuses on gathering and interpreting all the data we capture during our training. He distills all this data down to actionable information that allows you to personalize your training.T
Training Article Strength Training Article The One Hour Workout for Speed and Power - I find that dedicated, focused time for strength training is hard when you are spending so much time training the run, cycle and swim. Dedicated strength training is critical and here is a one-hour session I found that really pushes me.
The Garmin 920XT is the training watch I use. This watch handles anything a triathlete can throw at it both in and out of the water. Here is a post on some unique features of the 920XT you may not be aware of. The accessories I have:
- Heart Rate Monitor (included)
- Triathlon Heart Rate Monitor – gathers heart rate in the water and then transfers when out of the water. It does not provide real time heart rate monitoring.
- Quarter Turn Bike Mount Used to mount the computer without the strap onto a bike mount. I sue this on top of my between the arms water bottle mount. You don't need this for the bicycle mount kit below.
- Quick Release Mounting Kit
- Bike Speed Sensor and Cadence Sensor - This is needed if you want to use your bike on a trainer and want to track speed, distance and cadence.
- Garmin Forerunner Bicycle Mount Kit Allows you to mount your watch, with strap, to your bike.
Foam Roller Recovery Tools – I use two different foam rollers for recovery. One is the smooth 36-inch roller and the other is the intense 12 inch rumble roller that really gives a deep message. Foam rolling really help loosen my legs and back. I foam roll regularly. Here is a post I wrote on foam rolling.
Triathlon Tuesday 1st Edition

I am a beginner triathlete so I spend a lot of time researching, learning and training. I benefit from all work others have done sharing lessons learned, product reviews and resources. There’s a lot out there.
I am putting together a weekly summary of things I have discovered, experienced myself, bought etc. Every Tuesday I will publish a brief post on what I discovered, bought, experienced in the hopes of helping on you this triathlon journey.
Here’s the first edition
1. A book I just finished and really enjoyed Triathlon 2.0: Data-Driven Performance Training by Jim Vance
This book distills down all the training and racing data you collect allowing you to efficiently train and race. A great resource to help design and specify a training and racing plan geared towards your strengths, weaknesses and goals.
2. Tower 26-Be Race Ready Podcast
Coach Gerry Rodrigues and pro triathlete Jim Lubinski host this regular podcast dedicated to open water swimming. With regular 30 minute podcasts Gerry and Jim condense the key information and workouts you need to be successful in open water. They help bridge the critical differences between pool and open water swimming. Great information from a proven coach and pro triathlete.
3. Zen and the Art of Triathlon Podcast
Brent Blankner hosts this podcast and as the ITunes summary says “A triathlete's view on training, racing, and living the multisport life. Listen in for insider tips, methods, dealing with family, injury, traveling, and racing.” This is a long podcast from the perspective of the working age grouper as he goes about balancing training, racing, work and family. Good practical information in the regular podcast. Each podcast cast last 2+ hours, and typically have an interview.
4. Fueling Mistakes Triathletes Make Article
In triathlons your success usually comes down to training and fueling. I found I was making a lot of fueling mistakes. This article describes four common fueling mistakes we have probably all made.
5. Beginning Running Tips Article
Running is the hardest of the three disciplines for me. I raced road bikes right after college and did swim some in my youth. As a beginner triathlete I am having the hardest time with the run. Be it finding the time, avoiding injuries or enjoying it. I found this article on beginner running tips interesting and helpful.
That's all for this week. Enjoy
CIRCA Planner System Pilot
Background
I enjoy writing and adjusted my note taking to incorporate handwriting. I seem to remember written material much better than typed items. This is extremely important to me.
The constraint of having to write, or even re-write in some cases, forces me to distill down and filter the critical from the nice to have items. I have so much stuff in my life and wanted a way to reduce how much I took in and saved. Handwritten capture of notes does that for me.
Along with coffee cups, fountain pens are my other hobby, obsessions. Hard to use my pens when I am typing everything. I also enjoy great paper and wanted to figure out how to incorporate the written word into a digital process where necessary.
Enter Circa
What Is It?

CIRCA is an entirely paper-based analog system from the Levenger Company. The system uses disks to hold the cover, pages, and other inserts together. These round disks allow the flexibility to add, remove, and move the pages and inserts around. These disks are available in various sizes, colors and materials. Numerous covers and accessories are also available. The punches produce unique holes that work directly with the disks for retention.
What I like about the system is the ease with which you can add or move pages around. With the hole punch accessories, you can add any paper or pages you want to your notebook.
Using the disks instead of a traditional ring system (think Franklin Covey) is that the overall thickness of your planner is thinner. This is relative to the size of the disks you use and the number of pages and inserts you have in your planner.
How I use it?
I have essentially a 4 notebooks set up in the US Letter size:

1. A Work Capture Notebook with a few reference sheets permanently included
2. A Work Archive Notebook
3. A Home Capture Notebook
4. A Home Archive Notebook
The Work and Home Capture Notebooks
These are my everyday capture pads. These capture notebooks are comprehensive, complete places I can go for anything that I’ve captured. Every meeting, thought, note and to do item is captured in these notebooks. They are always open on my desk and I can quickly jot a note, draw out a diagram or capture a random thought.
When I am away from home or my office I capture notes on my Midori traveler’s notebook that fits nicely in my back pocket. Towards the end of the day I transfer all my notes from my Midori into my CIRCA or if it is as do to item directly into Nozbe my task management system.
This I also use two types of pages in the notebook – the Circa Full-Page Ruled Refill Sheets that I purchased a 300 pack of and the Freeleaf Note Pads hole punched. I have three dividers in the notebooks although I haven't used all of them yet.
As I don’t really travel with these notebooks they are holding up well and function well.
Being able to add pages I am able to keep the Home Capture Notebook think which really makes writing easy. Using either my Rotring 600 Mechanical Pencil or a TWSBI Diamond 580 fountain pen I can capture with ease.
With the disks I can have the notebook open to a blank page and the cover is nicely folded under the notebook thus taking up the amount of desk space as a notepad.
My Work Capture is a nicer covered set-up
I have the Circa Dimensions Notebook, Letter size cover with the same paper. I also have a few key reference sheets that I like to have always with me in the office so I have these under a WORK divider. I also have a HOME divider as well to keep my work notes separate from any Home notes or thoughts I want to capture during the work day. This notebook travels with me both around the office complex but also on trips. It has held up extremely well although the cover does show scratches.
The disks hold the pages in extremely well and adding new pages is easy. I am not inserting and removing pages frequently so I haven’t experienced any paper fatigue in terms of the paper punches not holding. I typically insert daily sheets for meetings or reference materials for the day and then only remove them when I archive my notes every two weeks into the Archive Notebook.
My Work and Home Archive Notebooks
My archive notebooks all consist of the basic starter plastic cover with the black ¾ inch disks. During this trial phase I wanted to see how I was going to like it and didn’t want to sink too much money into the system.
After two weeks I physically archive my old home and work notes into these archive notebooks by date. If I ever need to go back to something I have it right, there.
Hole Punches
I have two hole punches one at work and one that sits on my desk at home. I have the single sheet Circa 1-2-3 Portable Punch at work. This is a plastic, compact punch that can sit in my desk drawer. This punches a single sheet of paper. The precision of the punches is remarkable with the paper lining up extremely well with the factory-punched paper.
This punch works by having 3 separate punches along the length of the paper and you insert the page and then push the three levers in succession. I have found that you need to be diligent about holding the paper in the punch as you move through the punch progression to make sure the punches are cleaner and completely through. This punch does tend to get clogged which makes aligning the next sheet difficult.
This punch is adjustable to the paper size you are suiting. This is a great compact single sheet punch.

The Circa Universal Desk sits at home. This punch is a multi-page page that can handle six pages. This is a metal punch with a single punch mechanism similar to the traditional 3-hole punch tool. This is also adjustable to the paper size. This is bulky and I would not recommend this as something that can travel or move about. More of a stationary punch. IF you were going to punch your own paper to use in the system I would recommend this punch. You get the benefit of multi-page punching along with the price of a mid range puncher. There is a 15 sheet higher volume puncher that I would only get if you are in a group / office user citation and needed a more durable / higher volume punch.
Overall
I have about $120 into my system at this point. The system is working for me. The ability to have a nicer notebook cover for work, the ability to interchange pages, and the ability is key. I enjoy the benefit of having all my notes together (archived) but also having the flexibility to even scan in a page or put it in a file if I want without having to tear a page out of a notebook is key for me.
The Levenger paper I find to be extremely high quality (specifics of the paper) and works well with fountain pens along with pencils and roller balls. I had been using Levenger pads before so that was not a big change. Also the ability to add pages as necessary is key for me. The disks don’t seem as clunky as a 3-ring binder and presentable in the workplace.
Overall I would recommend the system and I will be continuing to use the set up into the future. I would recommend you start with one of the starter packs. That way you can try out the different sizes and the overall system. Once you are set on the system and size then I would invest in a nicer cover, and some of the accessories. I would also recommend you get the smallest size discs you think you can get away with. They are fairly inexpensive and the number of pages each disk size can hold is deceiving. I have more than enough capacity with ¾ inch disks I am using.
Enjoy and share your thoughts below.
What I Learned Leading Up to My First Triathlon
I just finished my first sprint triathlon and here is what I learned and did leading up to the starting gun.
Pre-race
Checklists
Eliminate the stress of forgetting something for your race by using checklists. I have two main checklists:
- Packing List - everything I needed for the race day including pre-race fuel and clothes to wear home from the race. I included 5 categories - General, Swim, Bike, Run and Recovery.
- Race Focus List - key items I want to remember and focus on for the race. These included the length of my warm-up, that I wanted to go hard on the bike right before the run. This list will change race to race. I also jotted a couple of notes right after the race for things to remember for my next race.
Gear Bag
You need a gear bag. It doesn’t have to be a new, Ironman branded bag, anything that you can comfortably fit your gear into and preferably with various pockets. I like everything in its place. I used an old cycling bag I have had for 20 years. It worked great and was able to handle by helmet; two sets of shoes and everything except my wetsuit.
I literally had my checklist and gear bag together and checked off each item as I packed it in the bag. When the checklist was completed I knew the bag was complete and it went right into the car.
I packed my bag race day minus 2 (day-2). That way I had time to pick up any missing items. I recommend that you don’t wait until the day before. In most cases that is too late.
Day-1
With my bag packed and wetsuit in the car (assuming the race is wetsuit eligible) I am off to the race.
I headed to the race venue and picked up my packet as early as possible. Going the day before was key for me. You won’t be time crunched to have to get through getting your packet, getting marked, setting up your transition area and allowing enough time for a good through warm-up.
Pre-Race Briefing
Getting there Day-1 allowed me to attend the pre-race briefing; which was extremely valuable for this being my first race. The host shared a couple of tips that I used. I highlight those below.
Drive the bike and run courses
I was able to drive the bike and run courses. I noted the hills during the ride and identified areas where there was gravel around turns and other potholes to avoid. Really gave me confidence I knew what was coming on the run and bike.
I studied the transition area and knew exactly how the flow for each transition worked. Once again this eliminated more uncertainty.
Walk down and view the swim course
Understand what buoys are to your right, left where you turn etcetera. Easier to get that down on land rather than in the middle of race. Walk the transition from the swim up to the transition area. Any uneven ground, things to avoid? You have a change to see that.
After your Day-1 course review you have reduced some of the uncertainty and stress of the unknown. Now you are ready for Race Morning.
Race Morning
First thing I did was to get marked and get your timing chip. For this HFP race they don’t pass out the timing chips until race morning, along with body marking. Remember to place the chip on your LEFT Ankle, as this will ensure it doesn’t get tangled with your bike sprocket.
For my first race the transition area was first come first serve. I selected a spot that was right by a large flag. This was key for me being able to see when your transition area is. Remember it is easy to spot your bike coming off the swim, but when you are coming back for T2 after your bike you won’t have your bike as an indicator. Find a large easily viewable landmark to place your transition area.
Here are a couple of items I used during my first race
Garbage bag – it rained right up until 15 before the race started so I was able to get my gear set up for the transition and have it laid out inside the large garbage bag. My stuff was organized and dry. When nit stopped raining I was able to quickly get it out the bag and kept it dry.
Chalk – If you can’t get next to a landmark for your transition bring some sidewalk chalk or duct tape to put a big mark on the ground signifying your transition area. Your transition area is set, now its time to get the wetsuit on and head to the swim. You can also use duct tape.
Warm Up
Key - Warm up more than you think
I didn’t warm up enough and suffered a little on the swim. I learned that I needed to swim enough to feel tired which was the adrenaline burning off. You this by getting fully submerged and do 30 seconds of slow swimming with 15 second bursts. Getting your heart rate up is key and gives you a great warm-up. The colder the water the longer the warm-up. Cold water on your body and face during a race is a recipe for disaster and open water panic.
You are ready, oh one more thing -
Remember to Have Fun!
Get Your Kayaks Properly Stored with a Hoist Storage System
With three kayaks I needed a storage solution that got the kayaks out of the way and allowed easy access to the kayaks during the season. My family and I go out almost every weekend so a storage system that was easy to get them in and out of was key. The Sontax Kayak hoist system fit the bill for me.
Storage Basics
There are a variety of ways to store your kayak; some good some bad. You can stand them up in the corner; you can put them on horizontal racks against the way, you can hang them from the ceiling, and you can even lay them on the floor.
Within the kayak storage solution space there are commercial options and DIY options. Both are fine it’s just how much time and skill you have, along with the characteristics of your space. If you have a dedicated space just for your kayaks than maybe a simple rack system or even on the floor will work.
The location that I have for storing my kayaks is our detached garage and the kayaks will share the space with a vehicle, garden tools and other sports equipment. This space is definitely not a fully dedicated kayak storage spot.
From researching how to store a kayak, I wanted something that supports the kayak at multiple points and keeps it from getting banged and knocked around. Supporting the kayak at one pressure point can lead to potential warping and deformation.
I also wanted something that would keep the off the floor and above head height.
Kayak storage items to consider:
- Do you have a space dedicated to kayaks storage or will the space be shared?
- How many kayaks do you need to store?
- How often are you going to use your kayaks?
- Characteristics of your space (high ceilings, long wall space, etc.)
- Budget for storage system
- Do you want to build it yourself or purchase
I live in the Midwest so I will be using my boats a lot during April – October and then they will be stored during the winter. I have a detached garage with high ceilings (10.5 ft.) that services as a multi-purpose room with a car, and other outdoor stuff. The space gets a lot of traffic.
I decided on a pulley / hoist system to store my three kayaks close to the ceiling and out of the way. I needed the boats to be high enough so you could both walk and park a vehicle underneath.

I considered building my own pulley system until I saw the Sontax Kayak Hoist system at Menards for under $25. My time is worth something and between my time and the coast of the materials purchasing a system was a no brainer for me.
The system’s general specifications include:
- Rack, pulley system, mounting system, hardware, rope
- Heavy-duty steel construction with a black powder-coat finish
- Pulley system easily hoists goods up to 100 pounds to ceiling
- Ceiling mount design keeps the goods up and out of the way, allowing room for vehicles to park under
- Safe locking mechanism prevents accidental release
- Capacity 100 LBs
Installation
The hoist was easy to install. By the third hoist it took me about 30 minutes from box to ceiling. The hoist included everything I needed except for the length of 2x4 that I used. This wood is optional but I would suggest it.
Installation points to consider:
- Need to determine which way you will install considering the length of the kayak and the size of your space.
- Need to determine which way your ceiling joists are running.
- For multiple kayaks you need to measure the width of each boat and ensure that you install the hoists far enough apart.
- Need to install these on the ceiling joists or a piece of 2x4 attached to the joints. As you can see from my installation, I installed the individual brackets on a 2x4 and then secured the 2x4 to the ceiling.
- Using another piece of wood allowed more flexibility in terms of how close the individual pulleys were. I wanted to make sure than the kayak supports were not too close together but at a good to properly distributed the weight. Mine are about 48 inches apart. I have 11.5 foot sit-on-top kayaks.
Summary
As an active family we needed a storage system that would keep the kayaks safe, while allowing access on the weekly basis during the summer. As an active baby boomer I needed a system that was easy to get the kayaks in and out of. With two people this system is easy and you can lower the pulleys and get the kayak out and transferred to your vehicle or trailer. The system needed to allow for the garage to remain multiple uses.
The Sontax Kayak Hoist Storage System did just that. I would highly recommend it.
Summer in London
I am fortunate enough that I get to travel internationally for work. And that includes some pretty wonderful places, Sydney, Paris, London, Dubai. When I can, I try and go in a day before my meetings start to get acclimated and to enjoy the city.
In London I typically stay up around St. Paul's and captured this image on a trip last summer. Not bad for an IPhone 5 image.
Book Review – Living with a Seal by Jesse Itzler
I recently read Living with a Navy Seal by Jesse Itzler.
The author, Jesse Itzler is the founder of Marquis Jets and husband of Sara Blakely the founder of Spanx. I picked up this book after hearing Jess on Jeff Sanders’ The 5 AM Miracle podcast. A great podcast that I strongly recommend.
Book Summary
Jesse hires a Navy seal to live with him and his family for thirty-one days to transform his physical fitness but actually produces a greater transformation. Seal, as he is referred to in the book, has only one rule – Jesse must do everything he says; no exceptions. This 251-page book reads like a diary with each chapter a chronological discussion of the thirty-one days Seal spent with Jesse and his family.
Jesse actually includes the workouts that Seal puts him through and you can clearly follow his progression, however this isn’t a how to workout like a navy seal book. Rather this book is a description of a deeper transformation. Jesse is able to subtly describe and take you through the transformation day by day. Like watching your kids grow you don’t actually notice the transformation as you laugh and admire the daily activities.
My Takeaways
Respect
Respect what you do, where you are, and the environment you are in. Seal really instilled this in Jesse by continuous demonstration. Seal never complains or uses anything as an excuse. He shows you that you can respect something but also not being intimidated or daunted by something. Acknowledge whatever it is and then get after whatever you are there to do.
Minimalism
I also took away how powerful and useful minimalism can be. Seal came into Jesse’s home with a small backpack for the month, which was enough and didn’t interfere with what needed to be done or completed. Seal made what he had irrelevant. It was all about execution.
Total Commitment
Until you totally commit you have no idea about your true capabilities.
Seal described something called the 40% Rule. This is Navy premise that once your mind says you should quit you are really only at 40% of your true physical limit.
“If you want to be pushed to your limits, you have to train to your limits.” Seal
You don’t know your limits until you push and push and push. This was demonstrated on day one when the Seal had Jesse complete 100 pull-ups. And they stayed on the gym until they were done. Seal’s approach is the ultimate Getting Things Done approach.
Great read and highly recommended.
Space Shuttle Endeavour Is Huge
Space Shuttle Endeavour
In 2013 I visited Los Angeles and one of the highlights was seeing the Space Shuttle Endeavour in its temporary home. Endeavour was built as a replacement for the Challenger shuttle.
As I joined all the other guests in the Hall I wanted to try and capture something unique about the shuttle while isolating the huge machine from the people and exhibit. I thought this image of the exhaust did just that. What do you think?
6 Additional Features Available With the Garmin 920XT
I train with the Garmin 920XT. Along with the top-level features, options and benefits I thought I would highlight some of what I consider the second tier features and benefits. Here are six features you may not know about.
1. Track Steps – I wear my watch all day and track my steps. It also sets a goal for you each day based on the number of steps you historically walk. Your goal is updated daily. Kayak paddle strokes are even counted as steps if you paddle for exercise.
2. Metronome – Using a metronome can help increase your run cadence. No need to get a separate app for this, this feature is built right in.
3. Auto Pause – This feature automatically stops the watch when you stop or your speed drops below a certain level. Now you don’t have to be that guy…. jogging in place at the stoplight.
4. Sleep Tracking – Enable the sleep track mode and if you wear your watch to bed your key sleep metrics will be tracked.
5. Action Camera controlled – You can control your Garmin VIRB camera from the watch. Pair the device with your watch and you can control the camera through the watch timer or manual functions.
6. Phone Notifications – Pair the watch with your compatible Bluetooth phone and get notified when messages are received on your phone. You can set when notifications are on and off.
I actually found these features by reading the manual. I recommend downloading the PDF version of the manual from Garmin. With this document the Table of Contents and Index are hyperlinked to the specific section. I hope this helps you get the most out of your Garmin 920XT.
Changing Jobs the Professional Way
Everyone Makes Decisions – John Hayes
Professionalism and tactfulness are key with every job change. Everyone changes jobs, not just the millennials. That’s a key point as now more than ever there is a chance that your current boss or colleague could be a future boss. Or they may know someone at your new company. This is a key consideration and benefit of leaving in a professional way.
BACKGROUND
A close family member was changing jobs recently and wanted advice on how to execute the move effectively, professionally and most importantly without burning any bridges.
As someone who has been in my career for some time, and have people working for me, I thought it would be helpful to share the advice I offered him. I’m not a lawyer so these are just my opinions on how to change jobs professionally. If you have any concerns beyond these recommendations please seek out legal assistance.
We all hear “don’t burn your bridges”. What does that mean? Basically it means don’t leave in such a way that your current / former employer doesn’t want to hire you back. Having a “do not re-hire” designation in your human resources record is not desirable. Just another potential red flag to potential employers.
The New Job
First my advice on how to secure the new job before you resign from your current position.
Written Job Offer
Get the final job offer in writing from the new company. This is extremely important especially if you are working with a recruiter. You don’t want the summary the recruiter presents, you want a formal written offer from the company. Typically companies have a specific approval process for new hires so you can be reasonably assured that the written offer is coming from someone authorized to extent the offer.
Health Benefits
This applies primarily to folks in the United States. If you can’t afford to have a lapse in your health benefits, understand when your benefits start. Sometimes they start on the 1st of the following month. This could leave you with a gap, as most likely your benefits at your old job end at the end of the month. This is something to consider especially as you are planning your start and exit dates.
Start Date
Agree on the start date. You might want to take some time off between jobs so nailing down the start date is key. Typically this is discussed and included in your offer letter.
Other Benefits
Instead of having the discussion with the hiring manager save the benefits discussion for someone qualified with the new company that specifically understand the company’s benefits. This is when you discuss vacation time, 401(K) match, volunteer time, commuting benefits etc. When you discuss it with the benefits specialist it becomes a factual discussion. If you discuss it early on with the hiring manager it can be viewed as detrimental.
Now that you have the new job secured. Time to resign from the old job.
The Old Job
Formal Resignation Letter
Regardless of your level, always craft and present a formal resignation letter. Not only does this present you in a professional light it also acts as evidence that you did resign, and the specific date you will be leaving the company. Depending on your current circumstances with that company, and your work performance, this could eliminate any indication that you did not leave on your own accord.
There are many templates and letters available so search for one on-line and customize it to your liking. Doesn’t need to be an essay just a clear description of when you plan on leaving and thanking them for the opportunity they gave you.
Notice Periods
Unless you are on a contract which will stipulate your notice period, in the United States it is common practice to give a minimum of two weeks if you are in a staff level position or three weeks if you are in a leadership position.
Tendering your Resignation
If at all possible tender your resignation in person. Either set up a meeting or stop by your boss’s office to meet and submit your resignation.
During the meeting hand your boss the resignation letter and orally resign indicating your last date of your employment. I would also recommend that if asked you provide the name of your future employer. Withholding this information typically leaves you susceptible to bad feelings and potential issues. And with LinkedIn and other on-line resources they will be able to find out where you went.
Keep in mind that if you are going to a competitor you may be asked to leave the premises immediately. You will typically be paid your notice period but all your system, email, and physical access to the office will be removed.
Resign and Stay Cool
Always keep your cool and professionalism up. Remember, you can’t control how your boss or the company reacts but you an always control how you react. Everyone makes decisions, decide how you are going to react and conduct yourself. You are down to your last few weeks with the company; tough it out and maintain your professionalism.
The Counteroffer
I subscribe to the theory that you should never accept a counter offer. At that point you are viewed as damaged goods and really don’t have any long-term career opportunities with that company. You made the decision to leave, carry through.
The Exit Interview
Most companies have an exit interview process, typically with HR or an outside firm. Be careful with this. I would recommend that you offer professional, constrictive criticism if it is warranted, but never get personal about your boss or co-workers. Assume that everything you say will be passed along with the company.
I hope this gives you some tips and ideas to consider when you decide to leave your current role for greener pastures.
Why I am reading physical Magazines again
Are you chasing your dreams or just coasting along? Are you striving for personal gold or settling for silver?
The Champion's Mind

I am going back to reading physical magazines and books.
A few benefits with the physical version:
- Having a physical magazine around lets me pick up and read in sprints rather than feeling like I need to read the entire magazine in one sitting.
- The physical magazine is a great visual queue for me to read it.
- I can quickly tear out pages or jot down notes for items I want to keep. (I actually scan in the torn out pages and get them into Dropbox or Evernote.)
- I can actually get through the materials faster in physical form than electronic.
- I know when I have finished the material as the magazine goes right into recycling.
- I find reading the physical magazine makes it easier to get through the material.
So how am I reading now?
I subscribe to both the physical and electronic versions when they are both available. Most magazines offer deals on this 2 for 1 option so it is not that costly. More on the electronic version later.
I read with my Leuchtturm 1917 notebook by my side along with my favorite fountain pen, or my trusty Space Pen for taking notes. I capture notes and thoughts as I read. If there is a page that I want to save I just tear it out and scan it for further use. I find this works well for me with ads and full page items that I need to evaluate later.
When I am done I recycle the physical magazine.
Electronic Version
I use the electronic version for archive in case I want to go back and re-read or research something. Having the material around electronically in a single app essentially takes up no space and doesn't create any noticeable clutter.
For magazines that don't offer a physical version, or if I am traveling, I read the electronic version on my iPad. I still have my Leuchtturm 1917 by my side for notes.
I hope this is helpful and let me know in the comments below how you are consuming content.
Go From Snapshots to Storytelling Part 2

In Part 1 of How I Go From Snapshots to Storytelling with 3 Simple Questions, I described the questions I use to help move from snapshots to storytelling. In Part 2 I want to walk through a quick example of how I incorporate these questions into a vacation / location shoot. Just to be clear, I still capture the snapshots right up front as I am still not comfortable enough to go right into the focused storytelling at the risk of not getting any usable images. I'm working on that but want to set myself up for success.
As many of you know that follow me, I enjoy all things Disney. A few years ago I had a personal project with my Disney Friday Featured Images.
When I visited Orlando for that project I wanted to make sure I came away with nice, safe images for my family and to be able to post on the blog. I also wanted to be able to convey the Disney attention to detail and the emotion my youngest son experiences every time we go to the Magic Kingdom.
So I have a plan of attack which allows me to get both the safe but excellent images along with the emotion and detail shots.
There are four parks and we typically spend more than four days there so there is an opportunity to revisit each of the parks. The first visit through each park is when I capture the iconic images of the "Castle" "The Ball" and "The Hat". I also capture all the signs and attraction images I needed to identify the locations. I try and focus on this in the early morning light and then again during the late day light.
After I have these captured, reviewed and backed-up I am able to take the photography deeper. I can now focus on telling the story and conveying the emotions of the place without having to worry about getting my assignment work complete. I am free to then go through my question flow to get focused on conveying the deeper images. I need this, as I don't try and pose the images but rather have the questions answered and then I focus on capturing wonderment, happiness, without clouding my mind with other noise or thoughts
People will say that these images are better than the safe, shots but in my current photography development I need to capture the safe shots get my mind like water (thanks David Allen) and let me be completely focused in the emotional capture. No worry or anxiety means better images, for me.
As I move farther down the development of my photographic craft, the amount of time needed on safe to get to storytelling will be much much less, and I think this will be in direct correlation with my confidence and skill. Also the amount of pressure I put on myself will also cloud my ability to focus clearly on the emotion and storytelling.
I hope these two published posts help you get better more compelling photographic images as you move from snapshots to storytelling
I hope this helps.
When to Modify Your Goals Rather Than Take a Knee

Modifying Your Goals
As many of you know I have been training for the Raleigh 70.3 Ironman Triathlon. This was a stretch goal but something I was focused on.
During my training I experienced a knee injury and an achilles tendon injury. Along with many missed days of training due to sickness. Now as I write this I am fifteen weeks away from the race and it is time to reconsider.
I am reassessing my goal and objectively comparing my current fitness state, with the necessary fitness level I need for success, and the time available. Fifteen weeks is not enough time.
My "all in" approach is great for achievement and focus but is a detriment to my health. I know if I continue to push towards Raleigh I will go too fast too soon and there is a high risk of injury which would probably be more severe. So do I just take a knee and give up? Nope.
When you are faced with goals that are unachievable given the current circumstances you don't need to quit. Here is what I did:
What was your underlying reason?
My reason for doing the triathlon was to get in great shape. Training for the Raleigh race is not the only way to do that. I also wanted to do something completely different has I hadn't completed any triathlon.
Can you modify your measure of success?
Last time I checked the Raleigh race was not the only triathlon out there. What if I picked another race? I know I have sunk money into the entrance fee but that was not all lost. The money was an investment in, and drove my fitness level to this point so definitely worth it.
What are the facts?
I was unhappy, depressed and unmotivated after my latest injury and it was hard to set that aside and look at the facts. Talking with my doctors, and my coach I was able to conclude that I shouldn't just quit. I focused on the facts and not the emotional state I was in.
Should you quit?
I did review my current state and seriously evaluate quitting. I was depressed and unmotivated and considered taking a knee or quitting. I also focused on what I consider goal success which is have I improved my trajectory. Based on my true underlying reason for the goal was I really moving forward. My goal wasn't to be world champion but rather to get in great shape and achieve something totally different. I could still do it.
Re-adjust your goal?
What did I do? I got back up of the ground and registered for another race. This race is right after the Raleigh race in Mid-June and is a shorter race. I signed up for the Maumee Bay SprintTriathlon http://www.hfpracing.com/events/fit/maumeebay/eventinfo.htm .
When faced with the decision to quit or give up on a goal, take are hard look at your true reasons, gather the facts and see what your real alternatives are before you just quit.
How I go From Snapshots to Storytelling with Three Simple Questions Part 1

Photographic storytelling is what we all aspire to achieve. Our photographic journey seems to begin with snapshots, maybe even a little spray and pray, and then ultimately getting to telling a story. So what exactly is storytelling. Storytelling has been described as the effective use of
"Mood, Emotion, Narrative, Idea and Message"
For me this definition really struck a chord with what I was trying to achieve with my photography.
As I progress down the path towards storytelling, I use three simple, but powerful questions. Using these questions gives me the best chance of increasing my success rate of capturing the feeling and story rather than just a snapshot. I try to always ask these questions:
- How do I feel right now?
- What do I want the viewer to feel?
- How can I capture that emotion?
How do I Feel Right Now?
When I come to a photo shoot, a location or just get ready for a Saturday morning photo excursion I'm feeling something. When I first see or experience a location I have a feeling or at the very least a reaction. Just taking a second to formally ask myself what I'm feeling helps me formalize and identify the feeling.
Once I have the feeling identified I can now focus on how to convey that feeling. Just understanding the feeling and knowing what it is helps me work on expressing that feeling with a two dimensional medium. Does the location, or shoot make me feel excited, down, optimistic, pessimistic? No emotion is right or wrong but rather valid and should be explored. I try not to fight the emotion but rather identify it and immediately ask myself the next empowering question.
What do I want my viewer to feel?
Hopefully the answer to this question mirrors my answer to the first question, but maybe not. If it does then I move right on to Question #3. If not then I have a quick little internal debate to decide what answer is more compelling or important, and why they would be different. If they are different then I tend to lean towards what I am feeling. I find if I shoot for myself I have a better chance of succeeding and producing quality art. If the answer is the same then this just helps reinforce the answer as I go into Question #3.
How can I capture that emotion?
For me, just the exercise of asking, and answering this question, gets me focused and provides a single purpose to pursue with the image. For me limiting the alternatives is always best. With this one thought I then bring the camera to my eye and start capturing. I am able to also decide, will this convey the message better in black and white? Do I need HDR? What do I include or exclude from the frame? This is when the tough, and exciting part begins.
Another quick benefit -
An ancillary benefit I have gotten out of this is when I go back and cull my images down in Lightroom I am able to ask myself the same general questions to see if I was successful, and just as important, what could I have done to be more successful.
Summary
Like any muscle, exercising this thought process with these questions, helps improve the answers I get. For every question you ask yourself you will get an answer, the key is to get good, positive, productive answers.
Do I get it right each time? Absolutely not but I think my success rate has increased since I have started this quick pre-planning processing. To give myself the electronic slap in the face I have these three questions on my IPhone in the Notes app. This is what I try to do and hopefully is helpful for you as well.
In Part 2 I will offer a practical example of how I use this approach on a travel location shoot.
Relax with a Campfire

Want to relax, have a campfire. Last weekend here in Ohio we got a glimpse of Spring with 50 degree temps. We decided to have a campfire around dusk. When everyone else ventured back inside I sat around the file by myself and just enjoyed it. I noticed that I was really relaxed and enjoying the experience. I wasn't really thinking about anything just watching the flames and listening to the slow hiss of the water evaporating out of the wood.
I did a little research and found that it appears that thousands of years ago our ancestors meditated around the fire. There most be something to this.
So if you want a fun way to relax have a fire and enjoy thinking about nothing.